DISCLAIMER: The information on this page should only be used with adult supervision. The results on this page were determined with limited testing of a specific design, so USE THIS INFORMATION AND/OR FLAMABLE PRODUCTS AT YOUR OWN RISK! We are not responsible for any injuries resulting from use or misuse of information found on this site, and we recommend thorough testing of design modifications or new designs away from bystanders and taking full precautions to ensure personal safety.
Adapted from the R&D report presented at NARAM-47 by the Meatball Rocketry Team
Click here for a PDF copy of the original R&D report.
NOTE: Some photos in the Sport Rocketry article were taken by Tom Beach and are not included in this online version. Some other relevant photos (not published in the 2006 article) have been added.

SPIDER IGNITION 101
Spider ignition is not a new concept. My own PVC Spider design is nominally based on the spider ignition method used by Russians when flying Soyuz scale models in FAI competition. In an article from the November/December 1990 issue of American Spacemodeling, former scale champion Bob Biedron states that the Russian spider has a central chamber containing a charge of black powder, from which metal tubes lead to each motor nozzle in the cluster. The powder is electrically ignited and the resulting hot gases are directed into the motor nozzles via the metal tubes, resulting in simultaneous ignition of all the motors. Photos of the devices seem to indicate that they are made of precision-machined metal. Custom machining of such a device is too cost-prohibitive for the average modeler; therefore, I had to find alternative solutions and materials, such as schedule 40 PVC pipe, plywood, small diameter metal tubing, and standard fastener hardware. I also did not have access to any detailed documentation regarding past FAI spider designs, so I decided to create my own design from scratch. As a re-invention of the FAI spider, my PVC Spider device is reusable, fairly durable, and simple enough to redesign for a number of different motor configurations.
PYRODEX AS IGNITION FUEL


In July of 2003 I performed some simple tests using both Pyrodex P and Pyrodex RS to help evaluate the burn characteristics of the powder and its potential usefulness in conjunction with a Spider device. I determined that if either version of Pyrodex is tightly confined it will burn quite rapidly (explosively) and does not produce much (if any) flame, which would be necessary for motor ignition. It will, however, produce a bright “flare-up” if ignited unconfined in the open air. I therefore incorporated into my Spider design a powder-holding “cup” (see drawing) that is open to the air inside the device so that the Pyrodex charge can flare-up properly once ignited. My current design maintains approximately 2 cubic inches of space between the cup and the exhaust tube mounting plate to avoid over-confinement of the powder. The fixed size of the cup also limits the amount of Pyrodex that can be installed in the device.
STATIC TESTS
Static testing of the Spider after dark settled any concerns I had about over-confining the Pyrodex and rupturing the device. Video footage of my initial Spider tests shows that at the moment of ignition, flaming Pyrodex particles shoot upward quickly from the Spider’s exhaust tubes, producing an immediate and brief “whoosh” sound. (NOTE: When similar static testing is performed in regular daylight, the ignited Pyrodex particles look like a whitish-gray smoke and do not appear to be glowing.) One additional test using an Estes motor rigged to slide vertically (but not leave) a rail launcher showed that the flame from the Pyrodex is hot enough to ignite a motor.
FLIGHT TESTS


DESIGN CHANGES
After the initial flight test, it was determined that some changes needed to be made in the design of the Spider’s exhaust tubes. The first launch-tested spider employed permanently affixed K&S brass tubes to direct the Pyrodex flame. The thin brass proved to be too soft for the motor exhaust heat and thrust as all but one tube showed signs of severe melting after launch, rendering the Spider useless for future flights. I then proceeded to build a Spider with thicker-walled stainless steel tubing (part# 8457K22 from www.mcmaster.com). Post-flight examination showed that the tips of the steel tubes still melt and contort under the force of the motor exhaust; however, the melting is usually nominal and will probably not pose any problems for several flights. Nevertheless, steel is much more difficult to work with and may require professional services to cut parts cleanly.

The only other significant damage to the Spider from motor exhaust occurs internally. Depending on the cluster arrangement and slowness of liftoff, the powder cup itself may need to be reinforced or rebuilt after only a few flights, as it is merely a short section of BT-50 that is reinforced with either thick CA or epoxy clay. Future Spider work may involve strengthening the powder cup to minimize damage, but no changes have been made to the current design because the entire bottom plate assembly can be easily rebuilt if necessary.
SUPERIOR CLUSTER METHOD?


- Reliability is an essential component of safety with regard to clustering methods.
- An increase in complexity of an electrical system increases the probability of failure at one or more points.
- Increasing the number of preparation procedures and the length of time needed for prep (e.g. continuity or resistance testing of individual parts, insulating parts with tape, etc.) affords an increased opportunity for human error.
- If the majority of preparation work is done immediately prior to launch, likelihood of human error increases. This is especially true when such prep work is accomplished in the heat of competition when distractions are prevalent and time may be limited. In fact, eliminating distractions is impossible at any launch involving multiple rocketeers, as safety demands that everyone pay attention to what is happening around them. If most preparations can be completed in the workshop there is much more time for a modeler to check and double check for errors.
In light of these ideas we can conclude that a properly implemented PVC Spider is theoretically superior to the more complicated traditional clustering methods in terms of reliability, and thus in terms of safety. The Spider method reduces the potential for system failure and human error because it has fewer electrical components/connections, and it reduces the number of procedures and time involved in on-site launch prep, thus also reducing the amount of potential distractions that take place during launch preparations.
PERSONAL CONCERNS

FUTURE R&D
There are many things that can be done to further explore the use of the PVC Spider. It would be good to see some more flight testing to facilitate better statistical analysis, although I have little doubt that any further tests would be successful. Testing of different size PVC pipe for use in Spider bodies should be done. Also, since only Pyrodex RS was used in the flight tests for this project, Pyrodex P should be tested for its usability, though I suspect that it would work just as well as the RS. The addition of sideways-mounted “L” legs for igniting outboard motor clusters of Saturn I or IB scale models is another possibility for future testing (my very first Spider was just such a design, but it was never tested in flight conditions). Such a modification could implement threaded brass “lamp hardware” available at most hardware stores.
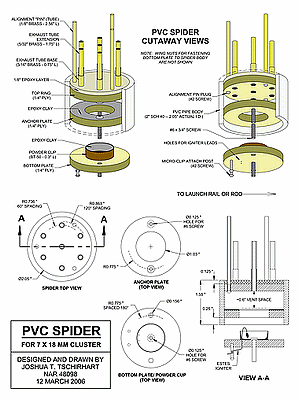 BUILDING A 7-MOTOR SPIDER
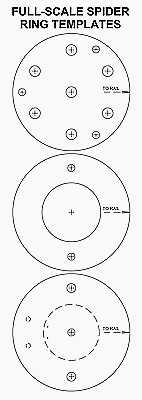
The drawings that are provided with this article can be used to build a Spider capable of igniting a cluster of seven 18mm motors. I will leave it up to the modeler to come up with an appropriate model design and motor mount to accommodate the Spider. Please note that the launcher mounts shown are intended for BT-80-based models and that the templates provided assume a specific radial location for the lugs/rail buttons relative to the motor spacing. Different lug locations may necessitate radially re-orienting the “top ring” of the spider relative to the lower rings and launch pad mount.
MATERIALS NEEDED:
2” Sch 40 PVC Pipe (2.05” I.D.) – 1.55” long (Spider body)
1/4” plywood (“Lite Ply” is okay)
*(7) 5/32” dia. Brass Tubes – 1.75” long (Exhaust Tube Extensions)
*(7) 3/16” dia. Brass Tubes – 0.75” long (Exhaust Tube Bases)
(3) 1/8” dia. Brass Tubes – 2.56” long (Alignment Pins)
(3) #6-32 x 3/4” Phillips head screws
(3) #6 wing nuts
Bonded washer (to fit over #6 screws)
BT-50 (or 24mm tube) – 0.3” long
(3) #2 screws – (used to plug alignment pins)
Adhesives – Epoxy and CA (probably fast & slow)
Fix It Epoxy Clay (from Apogee) or similar
*For Permanent Exhaust Tubes, use 3/16” dia. Stainless Steel—McMaster-Carr part# 8457K22)
 CONSTRUCTION TIPS
- Roughen up inside of PVC and outside of brass tubes with sandpaper (to aid glue adhesion).
- For drilling holes in the rings, I recommend using a drill press and starting with small pilot holes to maximize precision.
- Draw a vertical line down PVC (to align with the arrow on each ring).
- Thoroughly seal the edges and faces of ply parts with thin CA.
- File down metal “burrs” inside top ends of Tube Bases but NOT inside bottom ends (burr will act as a stopper when inserting tube extensions).
- Tube Bases and Alignment Pins should be inserted into the top ring (and tacked in place with CA) prior to installation of the ring inside the PVC body. Tube Base alignment can be aided by temporarily inserting Tube Extensions and using a second Top Ring as a jig for visual alignment.
- Glue Alignment Pin plugs (#2 screws) and seal joints with CA.
- Recess Top Ring Assembly into body 1/8” using 1/8” plastic/wood shims as a guide.
- Fill space above Top Ring with regular 2-part epoxy (I used 5 min epoxy just fine, but 30 min might be easier).
- Reinforce the inside of the Powder Cup and Top of Anchor Plate with Epoxy Clay AFTER gluing #6 screws into Anchor Plate and Bottom Plate and sealing joints and Cup with thin CA. You may even want to coat the underside of the Top Ring with the clay; just do not clog the Exhaust Tubes!)
- Use epoxy to glue Anchor Plate assembly – use Bottom Plate or 1/4” scrap material as shims for alignment.
- Don’t create any fillets on the underside of the Anchor Plate – just seal joint well with CA (fillets may interfere with fit of Bottom Plate in Spider body.
- Use a tiny drill bit (~1/64”) to drill igniter lead holes into epoxy clay/Powder Cup and through the Bottom Plate.
 SPIDER COUNTDOWN CHECKLIST (TYPICAL)
- Prep the rocket recovery system and motor mount/motor nozzles (I lightly scratch the propellant with a scribing tool to get make sure there is no excess clay in the nozzle).
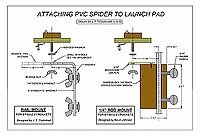
- Set up launcher and attach the “pad mount” to rod or rail. Install blast deflector below the Spider if pad is close to ground (not necessary if higher up—the Spider itself acts like a blast deflector of sorts).
- Insert and tape removable brass tubes into their mounts on the Spider body.
- Test fit spider alignment pins into motor mount. Sand and/or use baby powder for a smooth fit.
- Bend Igniter (see drawing) and insert into Spider Powder Cup. Wrap igniter lead wires around the microclip attachment posts. Use masking tape to insulate the igniter leads from L-bracket.
- Attach Bottom Plate to Spider pad mount using bonded washer & wingnut.
- Dispense Pyrodex into Powder Cup (approx. 2/3 to 3/4 full).
- Carefully slide Spider body onto Bottom Plate and anchor using wingnuts.
- Slide rocket model with motors onto launch rail and down onto spider alignment pins until there is about 1/32″ to 1/16″ gap between motor nozzles and Spider Exhaust Tubes. Use some sort of “standoff” to hold the model in place on the launcher.
- Attach micro clips to attachment posts.
- Countdown and launch.
- Clean motor gunk buildup from inside the Spider exhaust tubes before flying again. If you use the Spider more than once in one day, visually inspect the inside of the spider and tubes to be sure than motor “gunk” is not blocking the holes. It may help to keep an old toothbrush and some pipe cleaners available.
- Tape new brass tubes (or re-tape old tubes if they are usable) in place before flying again. Even if old tubes are in good shape, they will have to be re-taped (tape usually burns off).
- Use white vinegar to clean the Spider after flying day. Be sure to rinse with water and let dry.
DISCLAIMER: The information on this page should only be used with adult supervision. The results on this page were determined with limited testing of a specific design, so USE THIS INFORMATION AND/OR FLAMABLE PRODUCTS AT YOUR OWN RISK! We are not responsible for any injuries resulting from use or misuse of information found on this site, and we recommend thorough testing of design modifications or new designs away from bystanders and taking full precautions to ensure personal safety.
